- LanguageGuide
- 디자인패턴
- Accessibility
- HIG
- lineBreakMode
- 전달인자 레이블
- 애플
- lineBreakStrategy
- Apple
- Swift
- WWDC
- 애플사이다
- orthogonalScrollingBehavior
- github
- GOF
- Human Interface Guidelines
- 야곰아카데미
- iTerm
- Split View
- Keychain
- Combine+UIKit
- iPad
- IOS
- 스위프트
- CollectionView
- DiffableDataSource
- UILabel
- TOSS
- 앱개발
- UIKit
| 일 | 월 | 화 | 수 | 목 | 금 | 토 |
|---|---|---|---|---|---|---|
| 1 | 2 | 3 | 4 | 5 | 6 | 7 |
| 8 | 9 | 10 | 11 | 12 | 13 | 14 |
| 15 | 16 | 17 | 18 | 19 | 20 | 21 |
| 22 | 23 | 24 | 25 | 26 | 27 | 28 |
- Today
- Total
애플사이다의 iOS 개발 일지
[CollectionView] Section마다 다른 Scroll Direction 설정하기, Carousel Paging 구현하기 (feat. AppStore) - orthogonalScrollingBehavior 본문
[CollectionView] Section마다 다른 Scroll Direction 설정하기, Carousel Paging 구현하기 (feat. AppStore) - orthogonalScrollingBehavior
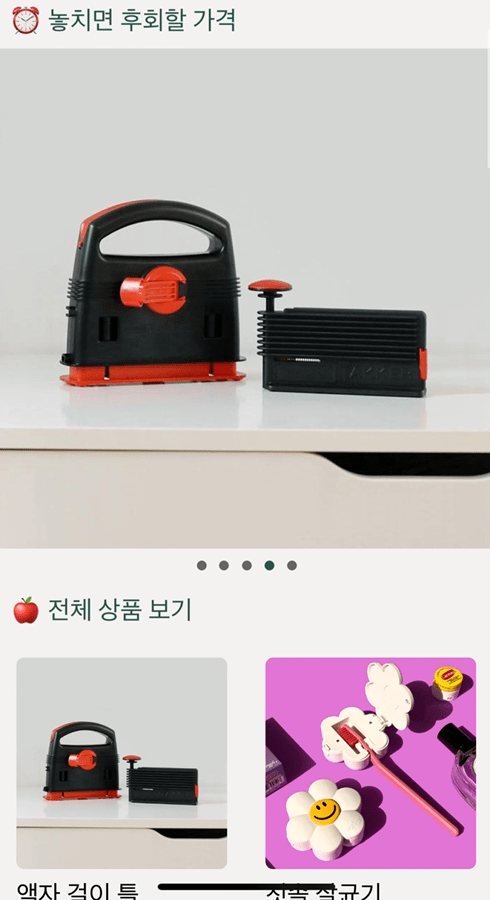
Applecider 2022. 6. 8. 22:13아래의 AppStore처럼 화면을 구현하려면 어떻게 할까?
일반적인 E-commerce 앱에서도 "상품 배너"와 "상품 목록" 화면을 이런 형태로 구현한 것을 자주 볼 수 있다.
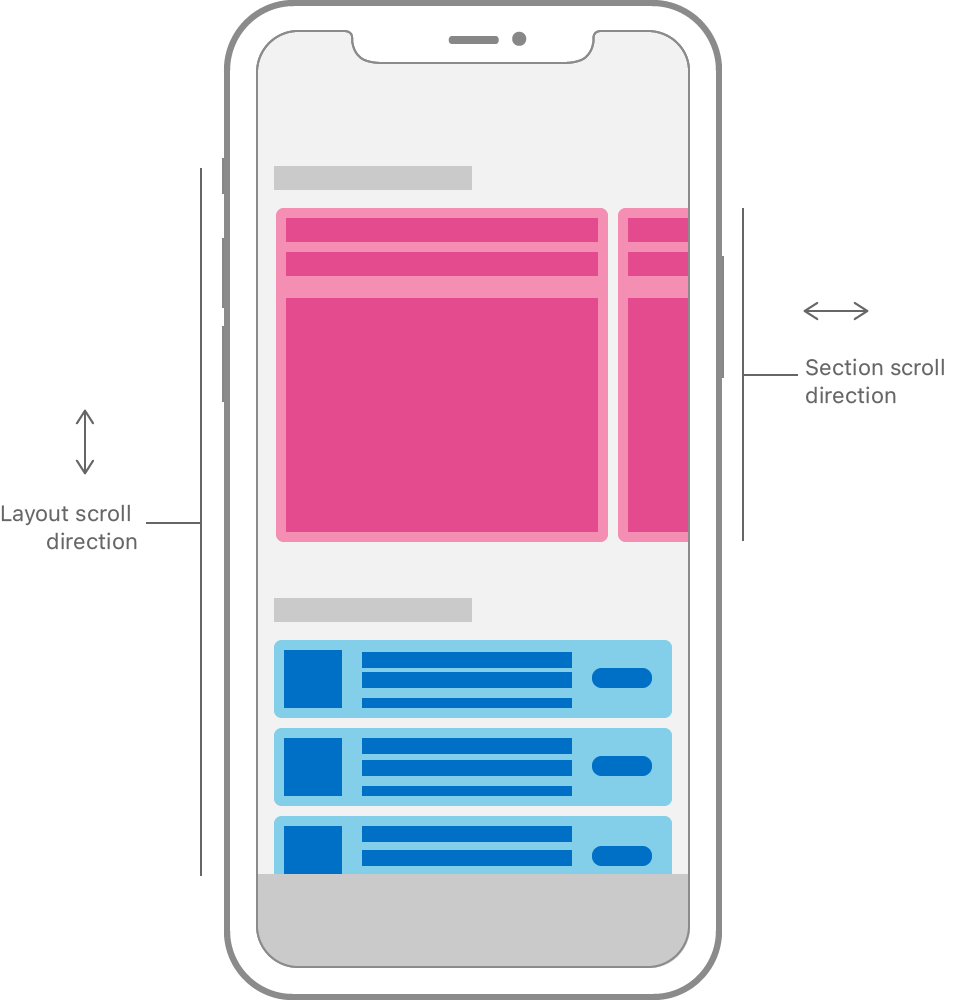
화면을 살펴보면 ✅ 맨 위의 Section은 Horizontal Scroll을, 그 아래 Section들은 Vertical Scroll을 하도록 되어있다.
즉, 동일한 CollectionView 내에서 "Section마다 Scroll Direction을 다르게" 지정하고 있다.
그리고 ✅ Horizontal Scroll을 할 때, Cell이 한 칸씩 일정하게 움직이고, 양옆의 Item이 살짝 보인다.

이렇게 Cell이 한 칸씩 일정하게 Scroll되는 화면을 뭐라고 부를까?
Paging, Pagination, Carousel Paging, Snap Paging 등 다양하게 불린다.
어떻게 검색할지 모르겠을 때는 AppStore like horizontal scroll 등의 키워드로 찾아보면 된다.
이런 화면을 구현하는 방법은 여러 가지가 있다.
원래는 방법-2가 흔했는데, 애플에서 편하게 쓰라고 방법-1을 만들어준 것 같다.
방법-1. orthogonalScrollingBehavior 프로퍼티 활용
결론부터 말하면, orthogonalScrollingBehavior 프로퍼티를 설정할 때
첫 번째 Section은 .groupPagingCentered, 두 번째 Section은 .none으로 바꿔주면 된다.
'orthogonal'은 수직 방향을 의미한다.
CollectionView의 layout axis를 기준으로 수직 방향이라는 뜻이다.
(위 화면처럼 CollectionView의 layout axis가 vertical이라면 -> orthogonal은 horizontal이다.)
orthogonalScrollingBehavior 프로퍼티의 default는 .none이다.
그래서 아무것도 설정하지 않을 때는 vertical scroll이 되는 것이다.
✅ horizontal scroll을 하려면 .continuous, .paging, .groupPagingCentered 등 .none이 아닌 걸로 설정해주면 된다.
✅ 이때 Horizontal Scroll을 하면서 양옆의 Item이 살짝 보이도록 하려면 .groupPagingCentered으로 하면 된다.
scrollDirection 프로퍼티와 orthogonalScrollingBehavior 프로퍼티의 차이점은?
기본적으로 CollectionView의 Item을 Scroll 하는 방향은 어떻게 결정될까?
CollectionView의 Layout configuration의 scrollDirection 프로퍼티에 vertical 또는 horizontal을 할당하면 된다.
하지만 이렇게 하면 CollectionView의 "모든 Section"의 Scroll 방향에 일괄 적용된다.
그래서 동일한 CollectionView 내에서 "Section마다 Scroll Direction을 다르게" 지정하려면,
section의 orthogonalScrollingBehavior 프로퍼티를 설정해야 한다.
🍎 CollectionView 공식문서
🔍 CollectionView 공식문서 하단의 Topics를 잘 살펴봤다면 금방 찾을 수 있다.
- CollectionView > Layouts > Section > Specifying Scrolling Behavior - orthogonalScrollingBehavior
- CollectionView > Layouts > UICollectionLayoutSectionOrthogonalScrollingBehavior
공식문서는 아래처럼 친절하게 그림으로도 설명해준다.

🍎 Modern Collection Views 예제코드
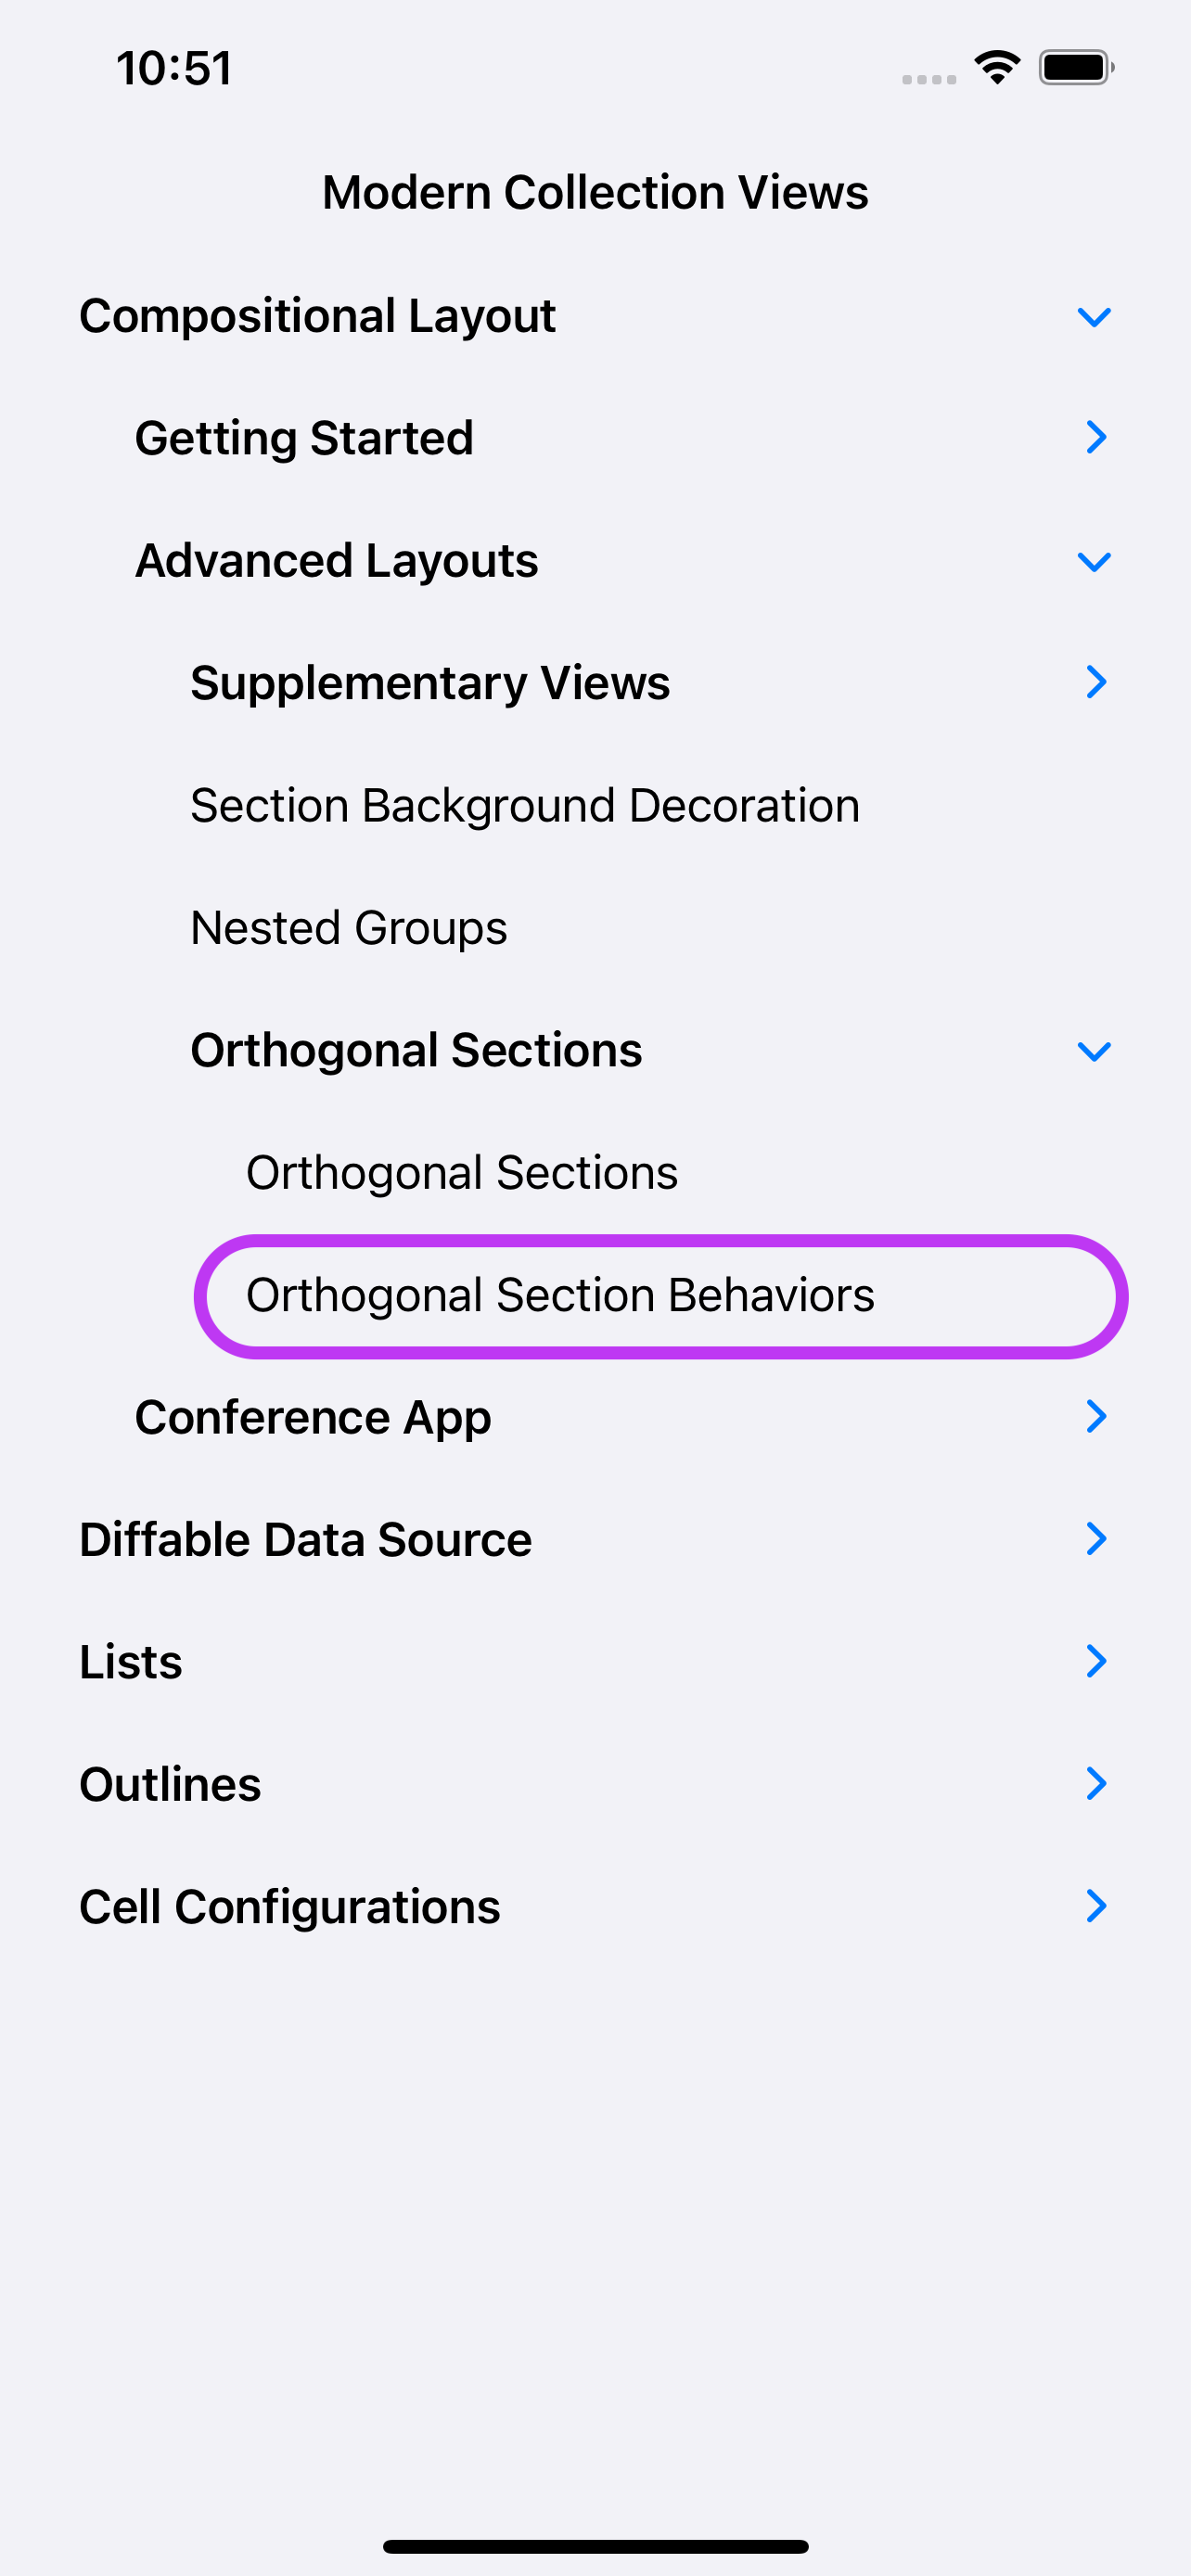
Modern Collection Views 예제코드 중에도 관련 내용이 있다.
*기본적인 예제는 Diffable DataSource 이해하기 (2/3) - 흔히 하는 실수, Modern Collection Views 예제 코드 포스트 참고
Compositional Layout 폴더 > Advanced Layouts View Controllers 폴더 > OrthogonalScrollBehaviorViewController 파일이다.
groupPagingCentered 외에도 continuous, continuousGroupLeadingBoundary, paging, groupPaging 등
orthogonalScrollingBehavior 종류별로 어떤 형태로 Scroll 되는지 볼 수 있다.


enum SectionKind: Int, CaseIterable {
    case continuous, continuousGroupLeadingBoundary, paging, groupPaging, groupPagingCentered, none

    // ✅ orthogonalScrollingBehavior 종류
    func orthogonalScrollingBehavior() -> UICollectionLayoutSectionOrthogonalScrollingBehavior {
        switch self {
        case .none:
            return UICollectionLayoutSectionOrthogonalScrollingBehavior.none
        case .continuous:
            return UICollectionLayoutSectionOrthogonalScrollingBehavior.continuous
        case .continuousGroupLeadingBoundary:
            return UICollectionLayoutSectionOrthogonalScrollingBehavior.continuousGroupLeadingBoundary
        case .paging:
            return UICollectionLayoutSectionOrthogonalScrollingBehavior.paging
        case .groupPaging:
            return UICollectionLayoutSectionOrthogonalScrollingBehavior.groupPaging
        case .groupPagingCentered:
            return UICollectionLayoutSectionOrthogonalScrollingBehavior.groupPagingCentered
        }
    }
}

func createLayout() -> UICollectionViewLayout {

    let config = UICollectionViewCompositionalLayoutConfiguration()
    config.interSectionSpacing = 20

    let layout = UICollectionViewCompositionalLayout(sectionProvider: {
        (sectionIndex: Int, layoutEnvironment: NSCollectionLayoutEnvironment) -> NSCollectionLayoutSection? in
        guard let sectionKind = SectionKind(rawValue: sectionIndex) else { fatalError("unknown section kind") }

        // ✅ leadingItem의 contentInsets을 할당
        let leadingItem = NSCollectionLayoutItem(layoutSize: NSCollectionLayoutSize(
            widthDimension: .fractionalWidth(0.7), heightDimension: .fractionalHeight(1.0)))
        leadingItem.contentInsets = NSDirectionalEdgeInsets(top: 10, leading: 10, bottom: 10, trailing: 10)

        // ✅ trailingItem
        let trailingItem = NSCollectionLayoutItem(layoutSize: NSCollectionLayoutSize(
            widthDimension: .fractionalWidth(1.0), heightDimension: .fractionalHeight(0.3)))
        trailingItem.contentInsets = NSDirectionalEdgeInsets(top: 10, leading: 10, bottom: 10, trailing: 10)
        let trailingGroup = NSCollectionLayoutGroup.vertical(layoutSize: NSCollectionLayoutSize(
            widthDimension: .fractionalWidth(0.3), heightDimension: .fractionalHeight(1.0)),
                                                   subitem: trailingItem,
                                                   count: 2)

        let orthogonallyScrolls = sectionKind.orthogonalScrollingBehavior() != .none
        let containerGroupFractionalWidth = orthogonallyScrolls ? CGFloat(0.85) : CGFloat(1.0)
        // ✅ group의 fractionalWidth를 1.0 보다 작게 설정
        let containerGroup = NSCollectionLayoutGroup.horizontal(
            layoutSize: NSCollectionLayoutSize(widthDimension: .fractionalWidth(containerGroupFractionalWidth),
                                               heightDimension: .fractionalHeight(0.4)),
            subitems: [leadingItem, trailingGroup])  // 주의 - trailingItem이 아니라 trailingGroup

        let section = NSCollectionLayoutSection(group: containerGroup)
        // ✅ orthogonalScrollingBehavior 설정
        section.orthogonalScrollingBehavior = sectionKind.orthogonalScrollingBehavior()

        // section header 설정
        let sectionHeader = NSCollectionLayoutBoundarySupplementaryItem(
            layoutSize: NSCollectionLayoutSize(widthDimension: .fractionalWidth(1.0),
                                               heightDimension: .estimated(44)),
            elementKind: OrthogonalScrollBehaviorViewController.headerElementKind,
            alignment: .top)
        section.boundarySupplementaryItems = [sectionHeader]
        return section

    }, configuration: config)
    return layout
}- 예제코드답게 SectionKind는 orthogonalScrollingBehavior 종류별로 여러 개가 있다.
- enum의 orthogonalScrollingBehavior 메서드에서 각 Section 마다 어떤 형태로 Scroll 할지 지정한다.
이중에서 .groupPagingCentered 방식을 가장 유용하게 쓰고 있다. - createLayout 메서드의 반환값은 CollectionView의 collectionViewLayout 프로퍼티에 할당된다.
- ❗양옆으로 다른 item이 보이게 하려면?
item의 fractionalWidth는 1.0, group의 fractionalWidth는 0.7 정도로 설정하고,
item의 contentInsets을 좌우 약 10으로 설정하면 된다.
예제코드를 보면 Cell 크기가 큰 것, 작은 것이 섞여있어서 처음 볼 때는 약간 헷갈릴 수 있다.
그래서 아래처럼 단순화시킨 화면의 코드도 공유해본다.

// ✅ 0번 = leadingItem, 1번/2번 = nestedGroup
//   +-----------------------------------------------------+
//   | +---------------------------------+  +-----------+  |
//   | |                                 |  |           |  |
//   | |                                 |  |           |  |
//   | |                                 |  |     1     |  |
//   | |                                 |  |           |  |
//   | |                                 |  |           |  |
//   | |                                 |  +-----------+  |
//   | |               0                 |                 |
//   | |                                 |  +-----------+  |
//   | |                                 |  |           |  |
//   | |                                 |  |           |  |
//   | |                                 |  |     2     |  |
//   | |                                 |  |           |  |
//   | |                                 |  |           |  |
//   | +---------------------------------+  +-----------+  |
//   +-----------------------------------------------------+

func createLayout() -> UICollectionViewLayout {
    let config = UICollectionViewCompositionalLayoutConfiguration()
    config.interSectionSpacing = 20

    // 매개변수 sectionProvider, configuration
    let layout = UICollectionViewCompositionalLayout(sectionProvider: {
        (sectionIndex: Int, layoutEnvironment: NSCollectionLayoutEnvironment) -> NSCollectionLayoutSection? in
        guard let sectionKind = SectionKind(rawValue: sectionIndex) else { fatalError("unknown section kind") }

        // ❗양옆으로 다른 item이 보이게 하는 방법
        // item의 fractionalWidth는 1.0, group의 fractionalWidth는 0.7로 설정하고,
        // item의 contentInsets을 주면 됨
        let leadingItem = NSCollectionLayoutItem(layoutSize: NSCollectionLayoutSize(
            widthDimension: .fractionalWidth(1.0), heightDimension: .fractionalHeight(1.0)))
        leadingItem.contentInsets = NSDirectionalEdgeInsets(top: 10, leading: 10, bottom: 10, trailing: 10)

        // ✅ trailingItem을 사용하지 않고 단순화시킴
//        let trailingItem = NSCollectionLayoutItem(layoutSize: NSCollectionLayoutSize(
//            widthDimension: .fractionalWidth(1.0), heightDimension: .fractionalHeight(0.3)))
//        trailingItem.contentInsets = NSDirectionalEdgeInsets(top: 10, leading: 10, bottom: 10, trailing: 10)
//        let trailingGroup = NSCollectionLayoutGroup.vertical(layoutSize: NSCollectionLayoutSize(
//            widthDimension: .fractionalWidth(0.3), heightDimension: .fractionalHeight(1.0)),
//                                                             subitem: trailingItem,
//                                                             count: 2)

        // group의 width를 .fractionalWidth(0.7)로 주면 양옆으로 다른 item들이 보임 (centerPaging)
        let containerGroup = NSCollectionLayoutGroup.horizontal(
            layoutSize: NSCollectionLayoutSize(widthDimension: .fractionalWidth(0.7),
                                               heightDimension: .fractionalHeight(0.4)),
            subitems: [leadingItem])
//          subitems: [leadingItem, trailingGroup])
        let section = NSCollectionLayoutSection(group: containerGroup)
        section.orthogonalScrollingBehavior = sectionKind.orthogonalScrollingBehavior() // section별로 scroll direction을 다르게 설정!!!

        // header 설정
        let sectionHeader = NSCollectionLayoutBoundarySupplementaryItem(
            layoutSize: NSCollectionLayoutSize(widthDimension: .fractionalWidth(1.0),
                                              heightDimension: .estimated(44)),
            elementKind: OrthogonalScrollBehaviorViewController.headerElementKind,
            alignment: .top)
        section.boundarySupplementaryItems = [sectionHeader]
        return section
    }, configuration: config)
    return layout
}
방법-2. scrollViewWillEndDragging 메서드 활용
ScrollViewDelegate의 scrollViewWillEndDragging 메서드를 사용해도 된다.
스크롤할 때 Dragging이 끝나기 직전에 호출되는 메서드이다.
이 방법은 이 블로그에서 친절하게 설명해주고 있다.
코드만 보면 이렇다.
var currentIndex: CGFloat = 0  // 현재 화면에 보이는 페이지의 index

func scrollViewWillEndDragging(_ scrollView: UIScrollView, withVelocity velocity: CGPoint, targetContentOffset: UnsafeMutablePointer) {
    // item의 사이즈와 item 간 간격을 구해서 하나의 item 크기로 설정
    let layout = self.collectionView.collectionViewLayout as! UICollectionViewFlowLayout
    let cellWidthIncludingSpacing = layout.itemSize.width + layout.minimumLineSpacing

    // ✅ targetContentOffset 이용하여 x좌표가 얼마나 이동했는지 확인
    // ✅ 이동한 x좌표값과 item 크기를 비교하여 몇 번째 index로 이동할지 구함
    var offset = targetContentOffset.pointee
    let index = (offset.x + scrollView.contentInset.left) / cellWidthIncludingSpacing
    var roundedIndex = round(index)

    // ✅ scrollView, targetContentOffset의 좌표 값으로 스크롤 방향을 알 수 있음
    // index를 반올림 (round)하면 item의 절반 크기만큼 스크롤해야 페이지가 넘어감
    // 스크롤 방향을 체크하여 올림 (ceil), 내림 (floor)을 사용하면 좀 더 자연스러운 페이징 효과가 나옴
    if scrollView.contentOffset.x > targetContentOffset.pointee.x {
        roundedIndex = floor(index)
    } else if scrollView.contentOffset.x < targetContentOffset.pointee.x {
        roundedIndex = ceil(index)
    } else {
        roundedIndex = round(index)
    }

    if isOneStepPaging {
        if currentIndex > roundedIndex {
            currentIndex -= 1
            roundedIndex = currentIndex
        } else if currentIndex < roundedIndex {
            currentIndex += 1
            roundedIndex = currentIndex
        }
    }

    // 위 코드를 통해 이동할 페이지의 좌표값을 targetContentOffset에 대입하면 됨
    offset = CGPoint(x: roundedIndex * cellWidthIncludingSpacing - scrollView.contentInset.left, y: -scrollView.contentInset.top)
    targetContentOffset.pointee = offset
}
// 출처: https://jintaewoo.tistory.com/33
이렇게 공식문서를 참고해서 아래 화면처럼 상품 배너 및 목록을 구현해봤다.
코드는 이 포스팅을 참고 (링크 추가 예정)

- Reference
- 예제코드 : Apple > Collection View > Sample Code - Implementing Modern Collection Views
- Apple > WWDC 2019 > Advances in UI Data Sources
- Apple Developer Documentation > CollectionView > Layouts > Section > Specifying Scrolling Behavior - orthogonalScrollingBehavior
- Apple Developer Documentation > CollectionView > Layouts > UICollectionLayoutSectionOrthogonalScrollingBehavior
- Blog > CollectionView paging 해보기
🍎 포스트가 도움이 되었다면, 공감🤍 / 구독🍹 / 공유🔗 / 댓글✏️ 로 응원해주세요. 감사합니다.
