
- Accessibility
- HIG
- 애플사이다
- LanguageGuide
- Split View
- orthogonalScrollingBehavior
- github
- IOS
- TOSS
- UILabel
- lineBreakMode
- 전달인자 레이블
- Swift
- 앱개발
- Human Interface Guidelines
- Apple
- WWDC
- UIKit
- iTerm
- 야곰아카데미
- 애플
- iPad
- 스위프트
- CollectionView
- lineBreakStrategy
- DiffableDataSource
- 디자인패턴
- Combine+UIKit
- GOF
- Keychain
| 일 | 월 | 화 | 수 | 목 | 금 | 토 |
|---|---|---|---|---|---|---|
| 1 | 2 | 3 | ||||
| 4 | 5 | 6 | 7 | 8 | 9 | 10 |
| 11 | 12 | 13 | 14 | 15 | 16 | 17 |
| 18 | 19 | 20 | 21 | 22 | 23 | 24 |
| 25 | 26 | 27 | 28 | 29 | 30 | 31 |
- Today
- Total
애플사이다의 iOS 개발 일지
[APNs] Push Notification 보내기 (1/2) - 관련 공식문서 요약 본문
앱이 Background 상태에 있더라도 사용자에게 알림을 띄우는 기능인 Push Notification에 대해 알아보자.
*Notification의 디자인은 HIG 문서 요약본 포스트를 참고
이번 포스팅에서는 공식문서를 훑어보고,
다음 포스팅에서 Notification 관련 4가지 주체에 대해 정리하면서, 예제 코드를 작성해볼 계획이다.
Push Notification이란?
특정 앱에서 사용자에게 알림을 띄우는 것을 말하는데,
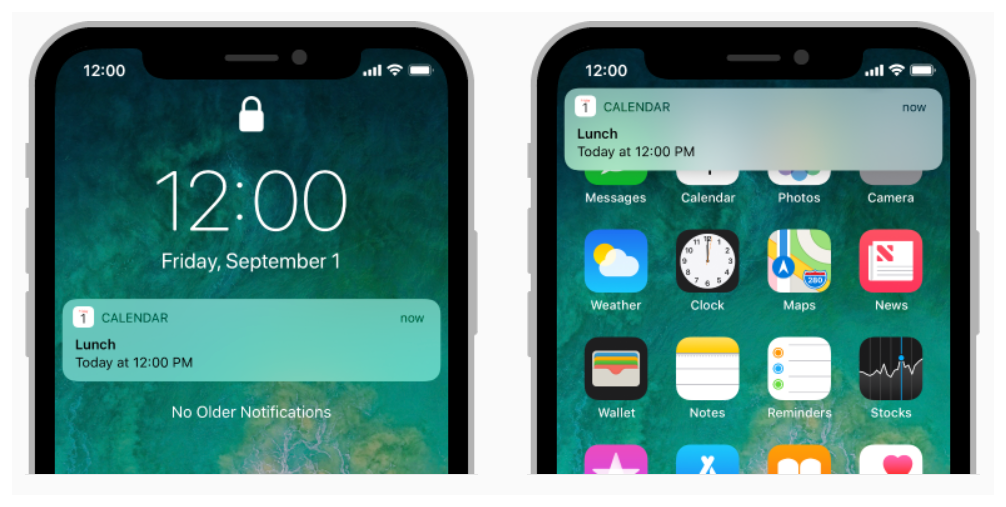
아래 화면처럼 잠금 화면, 알림 센터, 배너, 사운드, 배지 등의 형태가 있다.
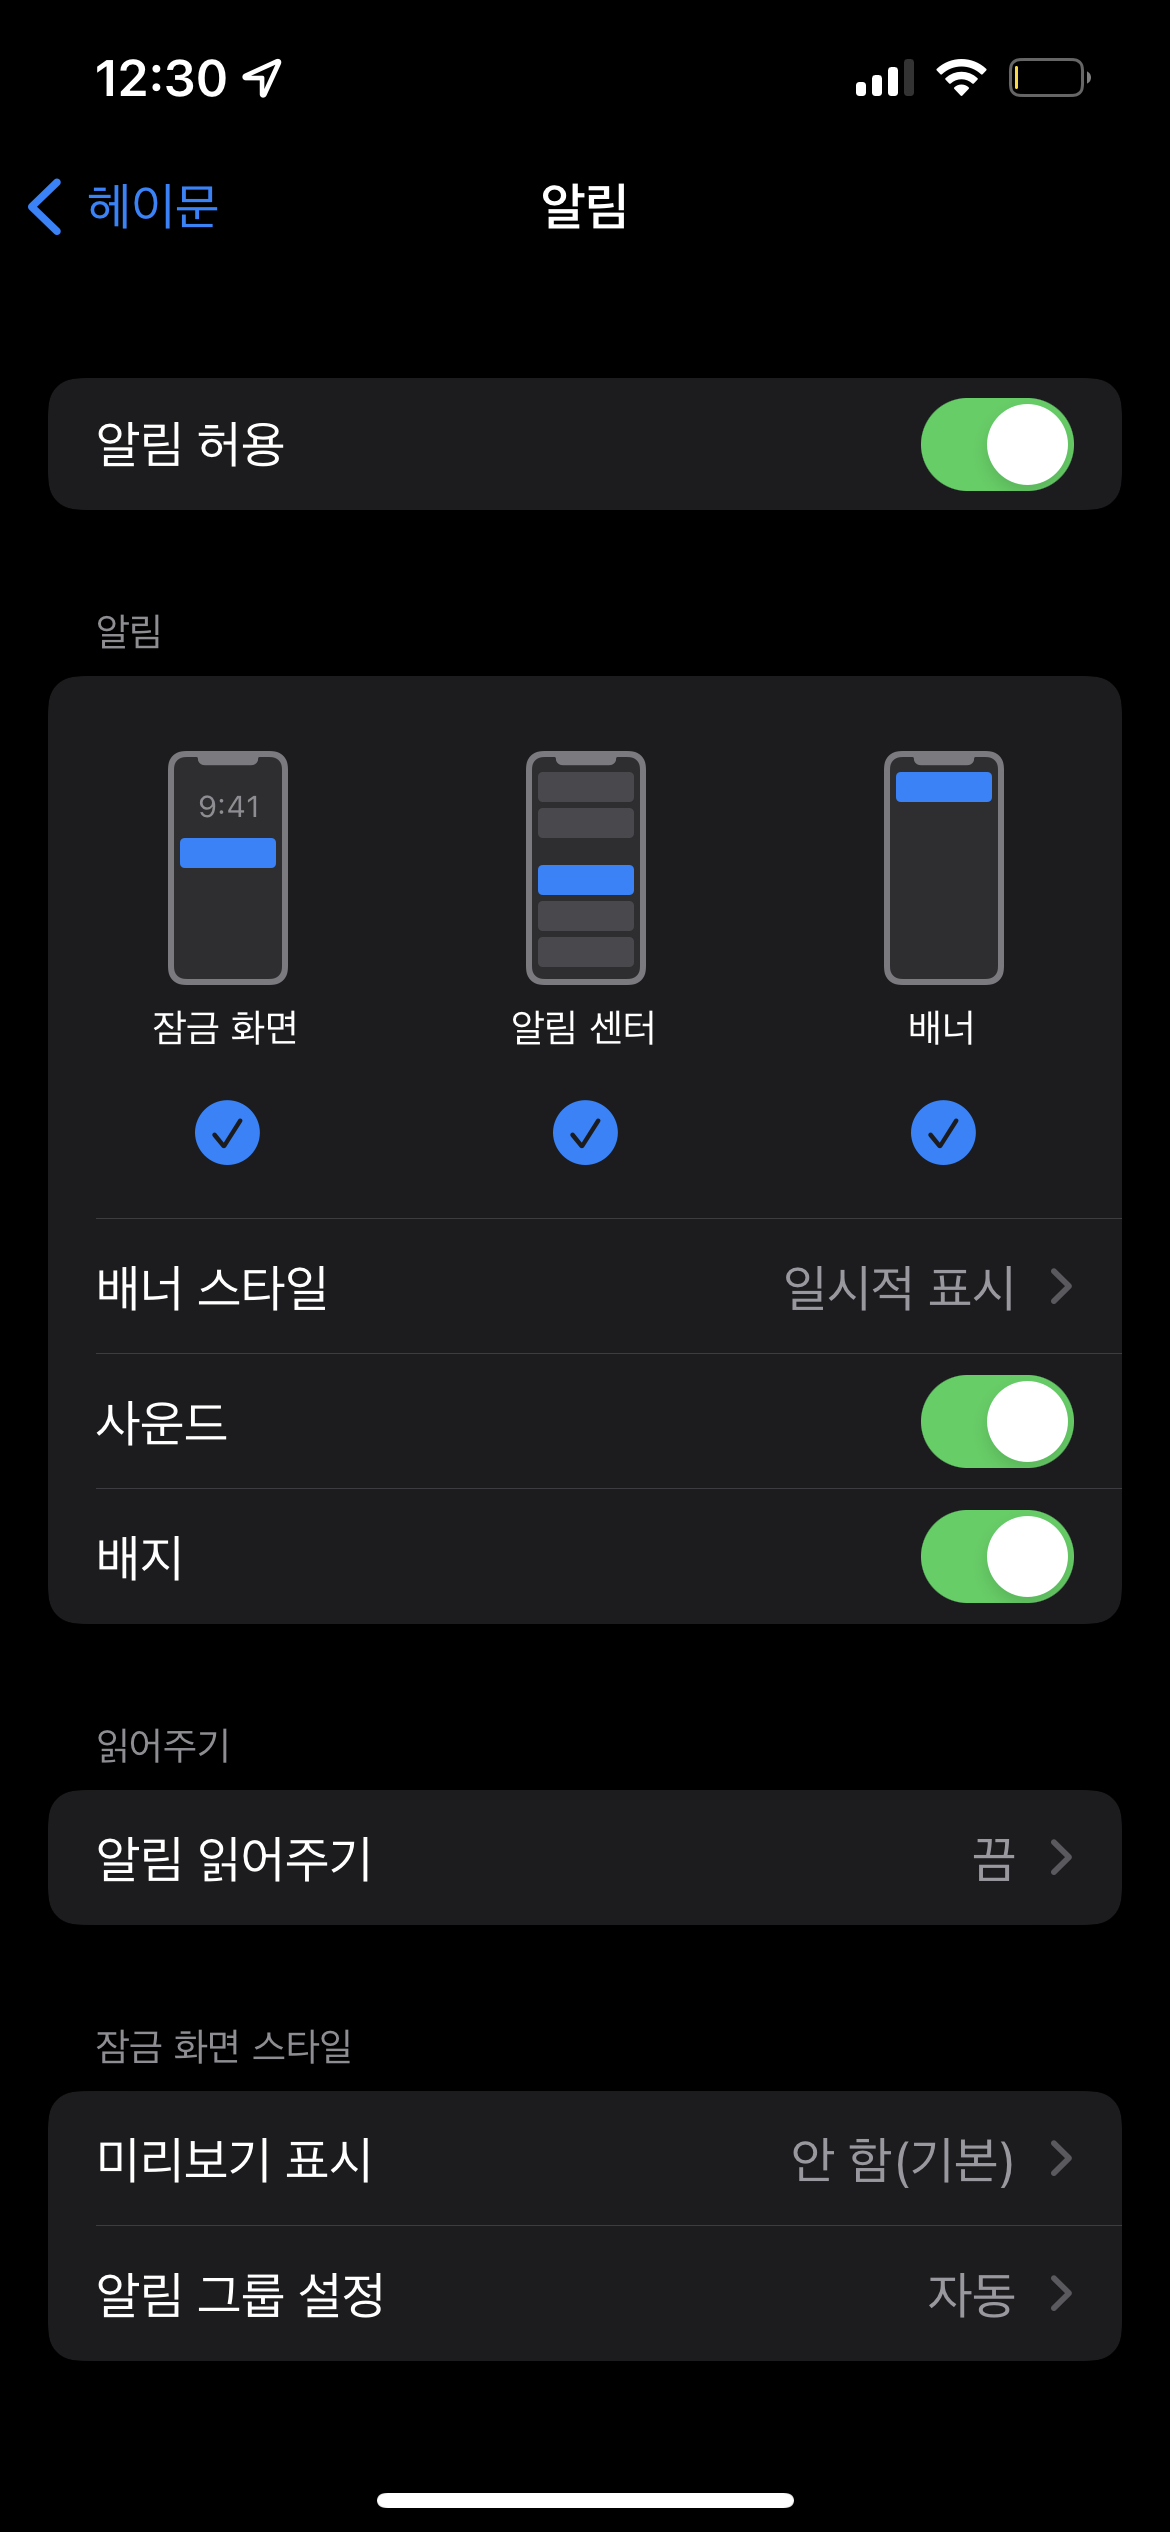
여기서 배지 (Badge)란 아래처럼 앱 우상단에 빨간 점으로 표시되는 형태이다.
참고 - What is a badge?

APNs란?
APNs는 Apple Push Notification service를 말한다.
third party 개발자 (ex. Push Server)가 앱에 Notification을 보낼 수 있도록 Apple에서 만든 알림 서비스이다.
User Notifications 공식문서들
대략적인 개념을 정리했으니 이제 공식문서를 읽어보자.
Push Notification 관련 최상위 공식문서는 Framework - User Notifications이다.
Framework라고 되어있으니까 나중에 import 어쩌구 해서 사용할 거라고 유추할 수 있다.
📔 Framework - User Notifications (링크)
- 요약 : 사용자 기기에게 notifications를 push한다. 이 notifications를 remote 서버로부터 보내거나, notifications 자체를 앱으로부터 local하게 생성해서 띄울 수 있다.
Push user-facing notifications to the user’s device from a server, or generate them locally from your app.
Overview를 한 줄씩 읽어보자.
앱의 사용자에게 중요한 메시지를 전달할 때 notification을 사용할 수 있는데, 앱이 실행 중인지와 상관없이 가능하다.
즉, 앱이 Foreground에 있어도 Background에 있어도 notification을 띄울 수 있다는 의미이다.
예를 들어 스포츠앱은 사용자에게 어떤 팀의 게임 스코어를 알려줄 수 있다. 이때 notification은 특정 앱에게 데이터를 다운 받아서 인터페이스를 업데이트하도록 알릴 수 있다.
notification은 alert를 표시하거나, 사운드를 내거나, 배지를 설정하는 형태로 나타난다.
notification은 앱으로부터 local하게 생성할 수도 있고, 개발자가 관리하는 서버로부터 remote하게 생성할 수도 있다.
- local notification : 앱 자체적으로 notification의 content 및 condition을 설정한다. 이때 condition (= 알림을 trigger할 조건)으로 time, location 등을 설정할 수 있다.
- remote notification : 회사의 백엔드 서버가 push notification을 생성하면, APNs가 notification을 관리하고 있다가 사용자의 기기에 해당 notification을 전달한다.
-> 앱 대부분 이 방식에다가 FMC (Firebase의 Cloud Messaging)을 추가적으로 활용한다.
User Notifications Framework는 아래의 목적으로 활용하면 된다.
- 앱이 지원하는 notifications의 타입을 정의한다. (사운드, 배지, 알림 센터 등을 말하는 듯)
- notification과 관련된 custom action을 정의한다.
- local notification을 스케쥴링한다.
- 이미 전달된 notification을 처리한다.
- user-selected action에 대응한다. (사용자가 알림의 특정 옵션을 선택했을 때를 말하는 듯)
시스템은 local/remote notification을 정해진 시점에 전달하기 위해 최대한 노력하겠지만, 전달이 보장되지는 않는다. (delivery isn’t guaranteed)
엥.. 이유는 모르겠지만.. notification이 설정한 대로 전달되지 않을 수 있는 가능성을 염두에 두어야 할 듯
PushKit framework가 특정한 타입의 notification에 대해서는 시간을 더 잘 지키는 전달 메커니즘을 제공한다. 예를 들어 VoIP 및 watchOS를 합쳐서 사용하는 경우가 그렇다.
이제 공식문서 하단의 Topics에서 읽어볼 만한 것을 추려보자.
최상단의 Essentials, Notification Management 항목은 당연히 읽어야 하고,
대부분 FCM을 활용한 remote notification을 구현하므로 Remote Notifications도 읽으면 될 것 같다.
시간이 있으면 Notification Categories and User Actions, Notification Responses도 보면 좋을 듯
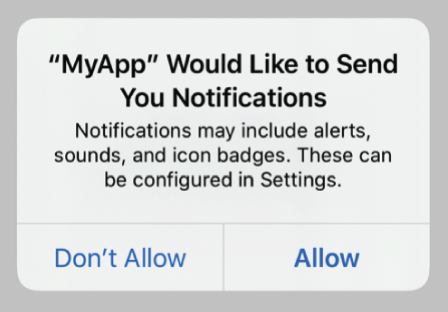
📔 Article - Asking Permission to Use Notifications (링크)
- 요약 : notification에 대응하고자 alerts/sound/badge를 표시하려면, 사용자에게 permission을 요청해야 한다.
- 문서의 permission = authorization
local/remote notification을 받으면 사용자가 볼 수 있게 alerts/sound/badge를 표시하게 되는데, 이러한 interaction은 앱이 실행 중이지 않거나, background에 있을 때 발생한다. (앱이 foreground에 있을 때는 시스템이 알아서 안 띄운다는 뜻인가???)
Explicitly Request Authorization in Context
let center = UNUserNotificationCenter.current()  // 싱글톤

// ✅ options에 요청할 iteraction type을 명시
center.requestAuthorization(options: [.alert, .sound, .badge]) { granted, error in
    // ✅ granted : 사용자가 alert에 대해 allow 했다면 true, not allowed 했다면 false
    // error: 에러가 발생했다면 error info, 에러가 없었다면 nil

    if let error = error {
        // Handle the error here.
    }

    // Enable or disable features based on the authorization.
}- UNUserNotificationCenter : 싱글톤 객체이고, notification 관련 activities를 관리한다.
- 사용자에게 permission을 요청하기 위해 requestAuthorization 메서드를 호출한다.
- 위 코드에서는 요청할 iteraction type으로 .alert, .sound, .badge를 설정했다.
- 앱이 최초로 authorization을 요청할 때, 시스템이 위 사진처럼 alert를 띄워서 allow 할지 말지를 사용자에게 묻고, 사용자 응답을 기록한다. 그래서 이후로는 사용자에게 묻지 않는다.
- 문맥상 왜 notification 기능이 필요한지 사용자가 이해할 수 있게 하면 좋다.
예를 들어 task-tracking 앱이라면, 첫 번째 task를 생성한 시점에 request를 띄우도록 한다.
(앱을 최초 실행했을 때 요청하는 것보다 UX 측면에서 낫다.)
Use Provisional Authorization to Send Trial Notifications
사용자 입장에서는 앱의 notification을 사용해보기도 전에 permission 요청에 대해 응답해야 한다.
따라서 사용자가 써보고 결정할 수 있도록 체험판 (provisional) authorization을 활용하면 좋다.
provisional notification은 시스템이 알림 센터에만 띄운다. (sound, 배지, 잠금화면에 나타나지 않는다.)
그리고 사용자는 버튼을 통해 notification을 유지할지 끌지 결정할 수 있다.
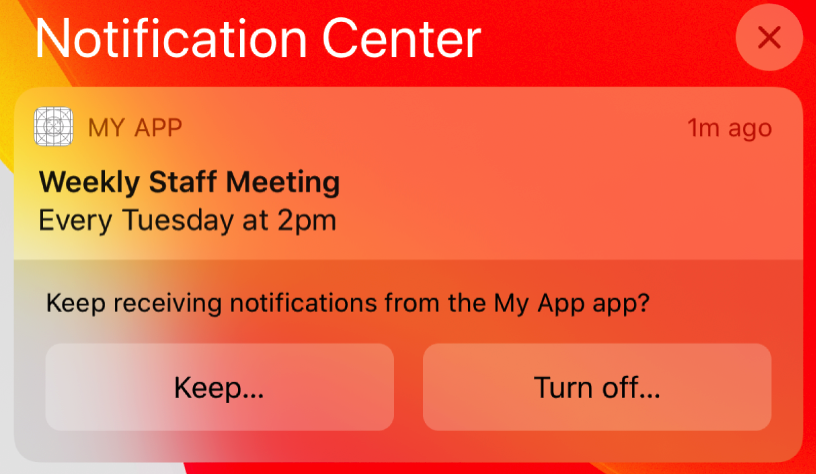
- Keep 버튼 : prominent/quiet notification 선택지를 보여준다.
- prominent : notification permission을 얻은 상태가 되어 alert/sound/badge를 띄울 수 있다.
(엄밀히는 provisional request에 포함된 항목들을 띄울 수 있다.) - quiet : 알림 센터에서만 띄울 수 있다.
- prominent : notification permission을 얻은 상태가 되어 alert/sound/badge를 띄울 수 있다.
- Turn off 버튼 : authorization을 거부하려는 사용자의 선택을 재확인하는 절차를 거친다.
provisional authorization을 요청하는 건 쉽다.
위에서 본 requestAuthorization 메서드의 options 매개변수에 .provisional만 추가하면 된다.
let center = UNUserNotificationCenter.current()
center.requestAuthorization(options: [.alert, .sound, .badge, .provisional]) { granted, error in  // options에 .provisional만 추가됨

    if let error = error {
        // Handle the error here.
    }

    // Provisional authorization granted.
}- 위에서 봤던 explicitly requesting authorization과 달리,
provisional authorization 코드는 사용자에게 permission을 요청하는 alert를 띄우지 않는다.
대신, 메서드를 최초 호출하는 시점에 자동으로 권한이 부여된다. - 사용자가 Keep/Turn off 버튼을 탭할 때까지 authorization status는 .provisional 상태가 된다.
- provisional authorization을 사용하면 앱을 최초 실행하는 시점에 authorization을 요청할 수 있다. ???
-> 뭐지... 방금 alert 안 띄우고 자동으로 권한 부여한다며... 확인 필요
사용자가 notification을 계속 사용할지 말지는 notification을 받은 이후에나 설정할 수 있다.
Customize Notifications Based on the Current Authorizations
local notification을 스케쥴링하기 전에 앱의 authorization status를 항상 확인해야 한다.
사용자는 언제든 특정 앱의 authorization 설정과 interation type을 변경할 수 있다.
getNotificationSettings 메서드를 호출하면 현재 notification 설정을 알아낼 수 있고,
이 설정값을 바탕으로 custom notification을 만들 수 있다.
let center = UNUserNotificationCenter.current()
center.getNotificationSettings { settings in  // 현재 설정값을 가져옴
    guard (settings.authorizationStatus == .authorized) ||
          (settings.authorizationStatus == .provisional) else { return }

    if settings.alertSetting == .enabled {
        // Schedule an alert-only notification.
    } else {
        // Schedule a notification with a badge and sound.
    }
}- 이 코드는 guard문을 통해 authorization status가 .authorized 또는 .provisional일 때만, 특정 notification을 스케쥴링하도록 했다.
- 또한 if문에서 interaction type에 따라 notification을 구성했다.
일부 interaction에 대한 권한이 없더라도 alert/sound/badge를 띄울 수 있다.
만약 UNNotificationSettings의 notificationCenterSetting 프로퍼티를 .enabled로 설정하면, 시스템은 알림 센터에 alert를 띄울 수 있다.
또한 notification center delegate의 userNotificationCenter(_:willPresent:withCompletionHandler:) 메서드를 통해 앱이 foreground에 있을 때 도착한 notification을 처리할 수 있다.
*참고로 notification center delegate의 userNotificationCenter(_:didReceive:withCompletionHandler:) 메서드를 통해 사용자가 반응한 notification action (user-selected action)을 처리할 수 있다.
📔 Class - UNUserNotificationCenter (링크)
- 요약 : notification 관련 activities를 관리한다.
네이밍에서 알 수 있듯이 notification을 관리하는 중심 역할을 한다.
User Notification 문서의 Topics에서도 대부분 볼 수 있는 내용이다.
UNUserNotificationCenter 싱글톤 객체를 사용해야 하는 상황은 아래와 같다.
- alerts/sound/badge를 표시할 수 있도록 사용자에게 authorization 요청
- notification type 및 custom action을 선언
- notification 스케쥴링
- APNs를 거쳐서 전달된 remote notification의 payload를 처리
- 이미 전달되어 알림 센터에 떠있는 notification 관리
- custom notification type과 관련된 user-selected action을 처리
- 앱에 대한 notification 관련 설정
incoming notifications and notification-related actions을 처리하려면, UNUserNotificationCenterDelegate을 채택한 객체가 필요하다.
여러 스레드에서 동시에 notification center에 접근했다면 (싱글톤 객체이므로) 접근한 순서대로 작업을 처리한다.
📔 Article - Setting Up a Remote Notification Server (링크)
- 요약 : notification을 생성하고 사용자 기기에 띄운다.
✨ 대부분 FCM을 활용하므로 이 문서가 중요하다.
remote notification의 주요 요소는 아래와 같다.
- 회사 서버 (provider server)
- APNs (Apple Push Notification service)
- 사용자 기기
- 앱 (사용자 기기에 설치된 상태)
remote notification은 회사 서버에서 시작하는데, 먼저 어떤 notification을 언제 보낼지 정한다.
해당 시점이 되면 (1) notification 데이터와 (2) 사용자 기기 identifier를 포함한 request를 생성한 뒤, request를 APNs로 보낸다.
APNs는 notification을 사용자 기기에 전달하는 것을 관리한다.
사용자 기기가 notification을 받으면, 기기 OS가 모든 사용자 interaction을 처리하고 notification을 앱으로 전달한다.
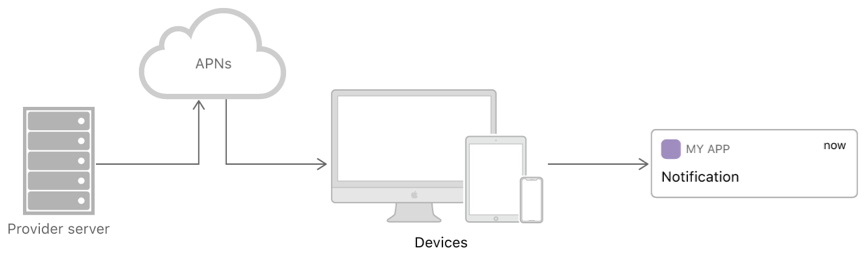
개발자는 provider server를 준비하고, 앱에서 notification을 처리하도록 구성해야 한다.
앱이 remote notification을 처리하는 방법은 Registering Your App with APNs 문서를 참고해야 한다.
Build Custom Infrastructure for Notifications
remote notification server를 셋업하려면 몇 가지 task가 필요하다.
이러한 task를 어떻게 구현할지는 회사의 infrastructure에 따라 다르며, 적절한 기술을 활용하면 된다.
- 앱 인스턴스로부터 device token을 얻고, 이 token을 앱 사용자 계정에 연동시킨다.
See Registering Your App with APNs - 사용자에게 언제 notification을 보낼지 정하고, notification payloads를 생성한다.
See Generating a remote notification - HTTP/2 and TLS ???를 사용해서 APNs에 연결하는 것을 관리한다.
See Sending Notification Requests to APNs - payload를 포함한 POST request를 생성하고, request를 HTTP/2 연결을 통해 전송한다.
See Sending Notification Requests to APNs - token-based authentication을 위해 정기적으로 token을 재생성한다.
See Establishing a Token-Based Connection to APNs
Establish a Trusted Connection to APNs
provider server와 APNs 간의 소통은 secure connection 하에서 이루어져야 한다.
따라서 connection을 생성하려면 AAA Certificate Services root certificate이 필요하다.
notification을 보내려면 provider server는 반드시 token-based or certificate-based trust with APNs 둘 중 하나가 필요하다.
-> 둘의 장단점은 나중에 더 찾아보자...
Understand What APNs Provides
APNs를 사용하면 UX에 좋다.
- 사용자 기기에 대해 인증된, 암호화된, 영구적인 IP 연결을 관리한다.
- 사용자 기기가 offline 상태일 때 전달된 notification을 저장해뒀다가, 기기가 online이 되면 포워딩한다.
- 기기의 power가 낮거나 offline일 때 등 notification이 즉시 전달되지 않았다면, 동일한 bundleID에 대한 notifications를 병합 (coalesce) 할 수 있다.
Remote notification 관련 문서를 더 읽어보자..
📔 Article - Registering Your App with APNs (링크)
- 요약 : APNs와 통신하고, 앱을 식별하는 device token을 받는다.
APNs는 사용자 기기의 주소를 알아야 한다. (notification의 도착점)
이 주소는 device/app에 대해 고유한 값인 device token 형태이다.
앱을 실행 (launch)할 때 앱이 APNs와 통신해서 device token을 받아오면, provider server에다가 전달하게 된다.
provider server는 notification을 전달할 때마다 이 token을 넣어서 보낸다.
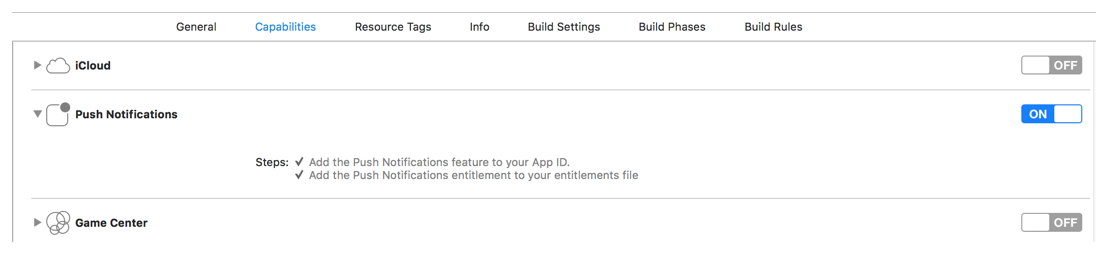
Enable the Push Notifications Capability
Xcode의 Capabilities에다가 Push Notification을 enable해야 한다.
개발자 계정에서 AppID에다가 push notification service도 enable 시켜야 한다.. 귀찮지만 인증서 필요..
Register Your App and Retrieve Your App's Device Token
APN에 앱을 등록하고, device token을 받는다.
provider server는 이 token을 가지고 있어야 notification을 보낼 수 있다.
앱을 실행 (launch)할 때마다 앱을 등록해서 device token을 받아와야 한다. -> 굳이 왜 매번 발급하는지 궁금하다면 이유는 아래에
이때 registerForRemoteNotifications() 메서드를 활용해서 앱을 등록하고,
App Delegate의 application(_:didRegisterForRemoteNotificationsWithDeviceToken:) 메서드를 통해 device token을 받아온다.
등록에 실패할 경우에 대비해서 application(_:didFailToRegisterForRemoteNotificationsWithError:) 메서드를 구현한다.
func application(_ application: UIApplication,
           didFinishLaunchingWithOptions launchOptions:
           [UIApplicationLaunchOptionsKey: Any]?) -> Bool {
   // Override point for customization after application launch.
   UIApplication.shared.registerForRemoteNotifications()  // ✅ 앱을 APNs에 등록
   return true
}

func application(_ application: UIApplication,
            didRegisterForRemoteNotificationsWithDeviceToken
                deviceToken: Data) {  // ✅ 앱이 등록되면 APNs가 device token을 보내줌
   self.sendDeviceTokenToServer(data: deviceToken)  // ✅ token을 provider server에 저장
}

func application(_ application: UIApplication,
            didFailToRegisterForRemoteNotificationsWithError  // ✅ 앱 등록에 실패했을 때 처리
                error: Error) {
   // Try again later.
}
*왜 APNs를 앱을 실행할 때마다 device token을 갱신할까? -> Important 항목에 답이 있다.

로컬 저장소에 device token을 cache하면 안 된다. APNs는 사용자가 백업으로부터 장치를 복원할 때, 사용자가 앱을 새로운 기기에 설치할 때, 사용자가 OS를 재설치할 때 새로운 token을 발급한다. 매번 시스템에서 token을 제공하도록 요청하면, token이 항상 최신 상태임을 보장받을 수 있다.
-> 결론 : APNs가 token을 자주 갱신하기 때문에 앱을 실행할 때마다 새로 받는 게 낫다는 뜻..
Forward Tokens to Your Provider Server
token을 받으면 사용자 계정 정보와 연결시키고, 암호화시켜서 provider server로 보낸다.
provider server는 notification을 보낼 때 기기 정보가 필요하다.
따라서 provider server에서는 token을 사용자 계정 데이터에다가 함께 저장해야 한다.
사용자가 여러 개의 기기를 사용할 가능성이 있으므로 사용자 계정에 여러 개의 token이 저장될 수도 있다.
📔 Article - Generating a remote notification (링크)
- 요약 : JSON payload를 통해 사용자 기기에 notification을 보낸다.
remote notification은 JSON payload의 형태로 사용자에게 전달된다.
payload는 user interaction (alert/sound/badge)를 지정하고, notification에 대응할 custom 데이터를 포함한다.

기본적인 payload는 Apple에서 정의한 key와 custom value로 구성되고,
custom key와 value를 추가할 수 있다.
APNs는 payload의 최대 용량을 제한하고 있다.
- Voice over Internet Protocol (VoIP) notifications : 5KB
- 그 외 remote notification : 4KB
Create the JSON payload
JSON dictionary를 사용해서 payload를 지정한다.
아래처럼 aps key에 대한 value로 dictionary가 들어있다.
그리고 이 dictionary는 1개 이상의 Apple-defined key로 구성된다. (이 key에다가 alert/sound/badge/silent를 넣는다.)
silent를 사용하면 background에서 조용히 시스템이 notification을 처리하도록 할 수 있다.
아래의 payload는 사용자를 game에 초대하기 위해 alert를 띄운다.
category key가 UNNotificationCategory에 등록되어 있다면, 시스템은 alert에 대한 action 버튼을 추가해준다.
그리고 사용자가 게임에 참가할 수 있도록 custom key/value (gameID)를 추가했다.
{
   "aps" : {
      "alert" : {
         "title" : "Game Request",
         "subtitle" : "Five Card Draw",
         "body" : "Bob wants to play poker"
      },
      "category" : "GAME_INVITATION"
   },
   "gameID" : "12345678"
}- 이 부분은 백엔드 서버에서 관리하기 때문에 iOS 개발자는 신경 쓸 필요가 없다.
아래 payload는 badge, sound를 띄운다.
sound 파일은 사용자 기기에 이미 존재하는 상태 (app bundle 또는 Library/Sounds 폴더)여야 한다.
그리고 notification을 만들어낸 message를 식별할 수 있도록 custom key/value (messageID)를 추가했다.
{
   "aps" : {
      "badge" : 9,
      "sound" : "bingbong.aiff"
   },
   "messageID" : "ABCDEFGHIJ"
}
Localize your alert messages
remote notification의 컨텐츠를 localize (지역화)하는 2개 방법이 있다.
- payload에 직접 localized strings를 포함시키는 방법
- provider server에서 사용자의 preferred language를 추적해야 함
- 사용자 기기에 저장된 preferred language 정보를 이용하면 되니까 서버가 몰라도 되는 거 아닌가??? - app bundle에다가 localized message strings를 추가하고, 시스템이 어떤 문자열을 사용할지 선택하게 하는 방법
- title-loc-key, subtitle-loc-key, loc-key 등의 payload keys를 사용한다.
{
   "aps" : {
      "alert" : {
         "loc-key" : "GAME_PLAY_REQUEST_FORMAT",
         "loc-args" : [ "Shelly", "Rick"]
      }
   }
}
Payload key reference
본문 table을 통해 aps dictionary에 들어갈 수 있는 key/value 정보를 확인할 수 있다.
📔 Article - Sending Notification Requests to APNs (링크)
- 요약 : payload 및 device token을 APNs에 전송한다.
provider server는 POST request를 구성해서 APNs에 보내야 한다.
request에 포함시켜야 할 정보는 아래와 같다.
- JSON payload
- device token
- 어떻게 notification을 전달할지를 지정하는 Request-header fields
- token-based authentication을 위한 provider server의 현재 authentication token
APNs가 request를 받으면, authentication token 또는 서버의 certificate을 통해 request를 validate한다.
validate하다고 판단하면 APNs는 device token을 활용해서 사용자 기기를 식별하고, payload를 기기에 보낸다.
Establish a Connection to APNs
HTTP/2 and TLS 1.2를 사용해서 provider server를 development/production server 중 하나에 연결시킨다.
development server는 테스트용, production server는 상용앱 목적으로 사용한다.
Create and Send a POST Request to APNs
HTTP/2 and TLS를 이용해서 POST notification을 APNs에다가 보낸다.
POST notification을 만들려면 아래의 정보가 필요하다.
- device token
- current authentication token (only if you’re using token-based authentication)
- JSON payload
그리고 header fields를 추가해야 하는데, 본문 table을 참고하면 된다. (required = 필수사항)
APNs는 HPACK (header compression for HTTP/2)을 사용하도록 하는데, header key/value가 중복 저장되는 것을 막아준다.
header를 특정 방식에 따라 encoding 해야 한다.
POST request 예시는 아래와 같다. (authentication token을 활용)
HEADERS
  - END_STREAM
  + END_HEADERS
  :method = POST
  :scheme = https
  :path = /3/device/00fc13adff785122b4ad28809a3420982341241421348097878e577c991de8f0
  host = api.sandbox.push.apple.com
  authorization = bearer eyAia2lkIjogIjhZTDNHM1JSWDciIH0.eyAiaXNzIjogIkM4Nk5WOUpYM0QiLCAiaWF0I
		 jogIjE0NTkxNDM1ODA2NTAiIH0.MEYCIQDzqyahmH1rz1s-LFNkylXEa2lZ_aOCX4daxxTZkVEGzwIhALvkClnx5m5eAT6
		 Lxw7LZtEQcH6JENhJTMArwLf3sXwi
  apns-id = eabeae54-14a8-11e5-b60b-1697f925ec7b
  apns-push-type = alert
  apns-expiration = 0
  apns-priority = 10
  apns-topic = com.example.MyApp
DATA
  + END_STREAM
{ "aps" : { "alert" : "Hello" } }- 위와 마찬가지로 이 부분은 백엔드 서버에서 관리하기 때문에 iOS 개발자는 신경 쓸 필요가 없다.
📔 Article - Handling Notification Responses from APNs (링크)
- 요약 : APNs server가 반환해주는 status code에 대응한다.
provider server가 APNs에게 POST request를 전달하면,
다시 APNs는 provider server에게 response를 준다.
response는 header를 포함하는데, 여기에는 response status를 나타내는 fields가 들어있다.
request에 성공했다면 response body는 비어있고,
에러가 발생했다면 body에 에러 정보를 담고 있는 JSON dictionary가 들어있다.
본문 표를 통해 header response의 의미를 파악할 수 있다.
request에 성공했다면 status code는 200이다.
payload 용량이 너무 큰 경우는 413이다.
request에 성공한 경우 response 예시는 아래와 같다.
HEADERS
  + END_STREAM
  + END_HEADERS
  apns-id = eabeae54-14a8-11e5-b60b-1697f925ec7b
  :status = 200
📔 Article - Handling Notifications and Notification-Related Actions (링크)
- 요약 : 사용자 interation에 대응한다.
사용자가 notification을 확인하고 interaction한 것에 대해 앱이 대응할 수 있다.
대응할 수 있는 사용자 interaction은 아래를 말한다.
- 시스템의 notification interface에 대한 user-selected action
- 앱이 foreground에서 실행 중일 때 도착한 notification
- silent notification
Handle User-Selected Actions
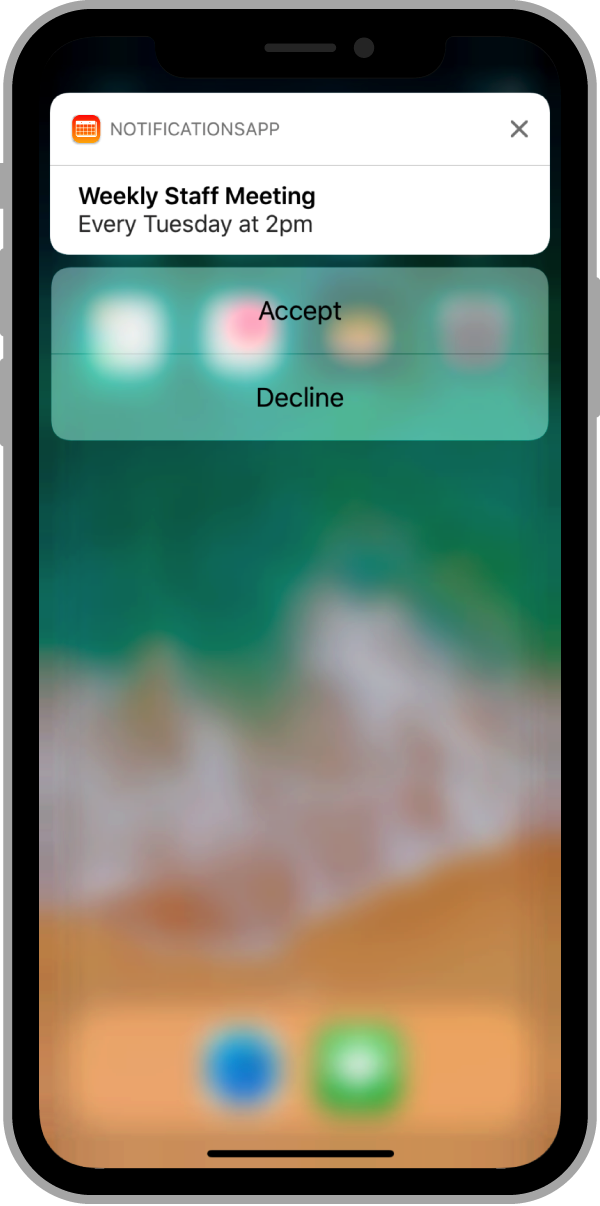
actionable notification은 아래처럼 1개 이상의 버튼을 제공한다.
사용자가 특정 버튼을 탭하면, 선택된 action이 앱에게 전달된다. 이때 app은 foreground에 올라오지 않는다.
선택된 action을 처리하려면 UNUserNotificationCenter delegate가 필요하다.
사용자가 특정 action을 선택하면, 시스템은 앱을 background에서 실행하고,
delegate의 userNotificationCenter(_:didReceive:withCompletionHandler:) 메서드를 호출한다.
func userNotificationCenter(_ center: UNUserNotificationCenter,
            didReceive response: UNNotificationResponse,
            withCompletionHandler completionHandler:
               @escaping () -> Void) {
   // ✅ Get the meeting ID from the original notification.
   let userInfo = response.notification.request.content.userInfo

   if response.notification.request.content.categoryIdentifier ==
              "MEETING_INVITATION" {
      // Retrieve the meeting details.
      let meetingID = userInfo["MEETING_ID"] as! String
      let userID = userInfo["USER_ID"] as! String

      switch response.actionIdentifier {  // ✅ 사용자가 선택한 action에 따라 분기처리
      case "ACCEPT_ACTION":
         sharedMeetingManager.acceptMeeting(user: userID,
               meetingID: meetingID)
      case "DECLINE_ACTION":
         sharedMeetingManager.declineMeeting(user: userID,
               meetingID: meetingID)
      case UNNotificationDefaultActionIdentifier,  // ✅ 사용자가 앱을 실행하거나 notification을 dismiss했을 때
           UNNotificationDismissActionIdentifier:
         // Queue meeting-related notifications for later
         //  if the user does not act.
         sharedMeetingManager.queueMeetingForDelivery(user: userID,
               meetingID: meetingID)
      default:
         break
      }
   }
   else {
      // Handle other notification types...
   }

   completionHandler()  // 처리가 끝났음을 시스템에게 알리기 위해 호출함
}
Handle Notifications While Your App Runs in the Foreground
notification이 전달됐을 때 앱이 foreground 상태라면, 시스템은 notification을 직접 앱에게 전달한다.
notification을 받으면 payload를 통해 원하는 작업을 할 수 있다.
예를 들어 payload에 들어있는 특정 데이터를 사용해서 앱의 interface를 업데이트할 수 있다.
그다음 예약된 alert를 숨기거나 수정할 수 있다.
앱이 foreground 상태일 때 notification이 도착하면
시스템은 UNUserNotificationCenter delegate의 userNotificationCenter(_:willPresent:withCompletionHandler:) 메서드를 호출한다.
이 메서드를 활용해서 notification을 처리하면 된다.
func userNotificationCenter(_ center: UNUserNotificationCenter,
         willPresent notification: UNNotification,
         withCompletionHandler completionHandler:
            @escaping (UNNotificationPresentationOptions) -> Void) {
   if notification.request.content.categoryIdentifier ==
            "MEETING_INVITATION" {
      // Retrieve the meeting details.
      let meetingID = notification.request.content.
                       userInfo["MEETING_ID"] as! String
      let userID = notification.request.content.
                       userInfo["USER_ID"] as! String

      // Add the meeting to the queue.
      // ✅ 앱의 interface를 업데이트하는 custom method
      sharedMeetingManager.queueMeetingForDelivery(user: userID,
            meetingID: meetingID)

      // ✅ Play a sound to let the user know about the invitation.
      completionHandler(.sound)
      return
   }
   else {
      // Handle other notification types...
   }

   // ✅ Don't alert the user for other types.
   completionHandler(UNNotificationPresentationOptions(rawValue: 0))
}
📔 Article - Declaring Your Actionable Notification Types (링크)
- 요약 : notification interface에다가 action 버튼을 추가한다.
actionable notification을 사용하려면 아래 작업이 필요하다.
- 앱 실행 시점에 1개 이상의 notification categories를 선언한다.
- notification categories에 action을 할당한다.
- 등록한 action을 처리한다.
- notification을 생성할 때 payload에다가 category identifiers를 할당한다.
아래는 ation을 등록하는 예시 코드이다.
// Define the custom actions.
let acceptAction = UNNotificationAction(identifier: "ACCEPT_ACTION",
      title: "Accept",
      options: [])
let declineAction = UNNotificationAction(identifier: "DECLINE_ACTION",
      title: "Decline",
      options: [])
// Define the notification type
let meetingInviteCategory =
      UNNotificationCategory(identifier: "MEETING_INVITATION",
      actions: [acceptAction, declineAction],
      intentIdentifiers: [],
      hiddenPreviewsBodyPlaceholder: "",
      options: .customDismissAction)
// Register the notification type.
let notificationCenter = UNUserNotificationCenter.current()
notificationCenter.setNotificationCategories([meetingInviteCategory])
생각보다 공식문서 양이 많았는데, 비슷한 내용이 반복되기 때문에 그렇게 오래 걸리지 않았다.
다음 포스팅에서 상용앱에서 대부분 활용하는 FCM (Firebase Cloud Messaging) 등의 중계 서비스를 포함한
Notification 관련 4가지 주체에 대해 정리하면서, 예제 코드를 작성해보자.
- Reference
- 기존 포스팅 - [HIG] Notifications - title, content, actions 설정 시 고려사항
- Apple Developer Documentation > Framework -User Notifications
- Apple Design > Human Interface Guidelines > System experiences > Notifications
- YouTube > iOS Academy - Push Notifications Tutorial (2022)
🍎 포스트가 도움이 되었다면, 공감🤍 / 구독🍹 / 공유🔗 / 댓글✏️ 로 응원해주세요. 감사합니다.
'iOS > 영문 공식문서 뜯어보기-iOS' 카테고리의 다른 글
| [UserDefaults] object(forKey:) 및 bool(forKey:), string(forKey:)의 차이점은? (0) | 2022.11.06 |
|---|---|
| [HIG] Notifications - title, content, actions 설정 시 고려사항 (0) | 2022.10.03 |
| [Keychain] 키체인 사용하기 (예제 코드) (0) | 2022.08.27 |
| [Keychain] 공식문서 읽는 방법 - 공식문서만으로 키체인을 이해해보자 (긴글 주의) (0) | 2022.08.26 |
| [AutoLayout] CHCR이란? Label의 default CHCR 값은? - 공식문서 오류 정정 (0) | 2022.06.16 |


